Jacksmith Beginner Crafting Guide: Melting, Pouring & Hammering
Master the fundamental forging steps in Jacksmith: ore melting heat, mold pouring accuracy, rhythmic hammer strikes, and grip assembly.
FAQ
How do you achieve 100% forging accuracy in Jacksmith?
Does weapon crafting quality affect battle results in Jacksmith?
How long does each ore take to melt in Jacksmith?
The Four Pillars of Jacksmith Blacksmithing
In Jacksmith, every weapon crafted for your warrior clan directly determines their survival on the battlefield. The blacksmithing process is divided into four distinct phases: Melting, Pouring, Hammering, and Assembly. Mastering these four disciplines is the difference between leading a triumphant army or watching your soldiers crumble before early goblin swarms.
Ore Selection ➔ Bellows Heating ➔ Mold Pouring ➔ Anvil Hammering ➔ Component Assembly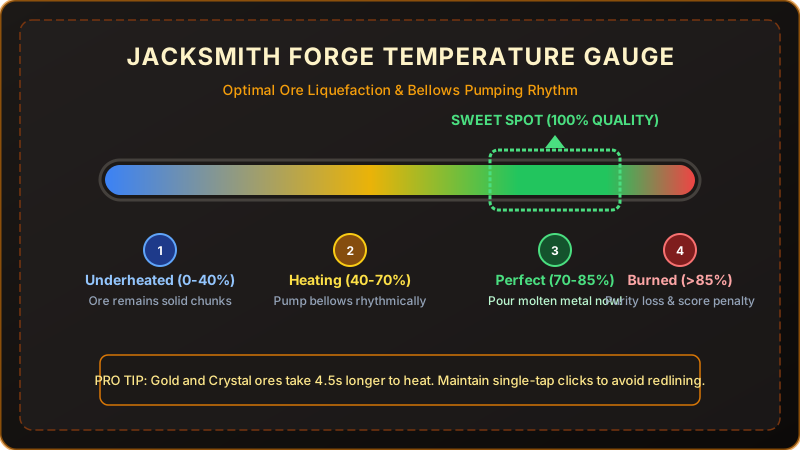
1. Ore Selection & Crucible Melting
When animal warriors arrive at Jacksmith’s mobile forge wagon, they place custom orders specifying weapon types and desired metal blends. Melting is where the craft begins, and temperature regulation is crucial.
Melting Speed and Temperature Thresholds
Every metal in Jacksmith features a unique melting point, requiring precise bellows rhythm to hit the optimal green zone (70% to 85% on the temperature gauge):
| Metal Ore Tier | Base Melting Duration | Bellows Rhythm Strategy | Durability Scaling | Primary Equipment Role |
|---|---|---|---|---|
| Copper Scrap | 3.5 seconds | Rapid light taps | 1.0x (Standard) | Starter daggers and practice broadswords |
| Bronze Nuggets | 4.8 seconds | Steady 1-click per second | 1.25x | Early buckler rims and hunting bowheads |
| Iron Ore | 6.2 seconds | Medium pulses | 1.60x | Standard soldier broadswords and mace heads |
| Silver Ingot | 8.0 seconds | Controlled slow heating | 2.10x | Undead-cleaving blades and sniper arrow points |
| Gold Ingot | 10.5 seconds | Deep sustained bellows pumps | 2.80x | Royal knight broadswords and enchanted armor |
| Crystal Alloy | 14.0 seconds | High-intensity precision rhythm | 3.50x | Endgame dragon-slaying weapons and magic catalysts |
Three Rules for Perfect Melting
- Never Redline the Gauge: If the temperature pointer enters the red zone (>85%), metal boils and loses structural purity, inflicting an immediate 15% quality penalty.
- Pre-heat for Heavy Ores: For Gold and Crystal blends, begin pumping the bellows immediately as the crucible lowers into the coals.
- Blend Purity: When customers request alloy blends, add the heavier metal first so both ores melt simultaneously. Consult our full breakdown in the Ores and Materials Guide.
2. Pouring the Molten Metal into Molds
Once the crucible is glowing green, the pouring station activates. Pouring measures your cursor stability and flow regulation.
- Positioning the Spout: Drag the ladle directly above the mold’s center reservoir.
- Flow Control: Tilt the crucible with a steady click-and-drag motion. A smooth, vertical stream minimizes air bubbling.
- Mold Overflow Penalties: Molten ore spilled over the sides of the clay mold wastes precious metal and leaves casting voids, causing weapons to chip easily in combat.
- Filling Capacity: Fill the mold until the indicator reaches exactly 100%. Stopping early leaves an incomplete blade tip, while overfilling creates messy slag edges.
3. Anvil Hammering and Edge Shaping
After cooling in the water trough, the raw casting moves to the anvil for hammer shaping. Hammering determines weapon sharpness, critical strike multipliers, and swing balance.
Mastering Hammer Rhythm
- Contracting Target Rings: Glowing concentric rings appear along the blade perimeter.
- The Bullseye Window: As the outer ring shrinks toward the inner target circle, click the mouse button the split-second they overlap.
- Strike Classification:
- Perfect Strike (100% Score): Ring contracts to inner bullseye (±0.05s tolerance).
- Good Strike (80% Score): Ring struck slightly early or late.
- Miss / Clang (0% Score): Striking outside the ring bounds deforms the blade spine.
- Edge Beveling: Heavier two-handed weapons (detailed in our Swords and Blades Deep Dive and Axes and Halberds Deep Dive) feature up to 12 strike points requiring rapid rhythmic sequences.
4. Component Assembly & Part Alignment
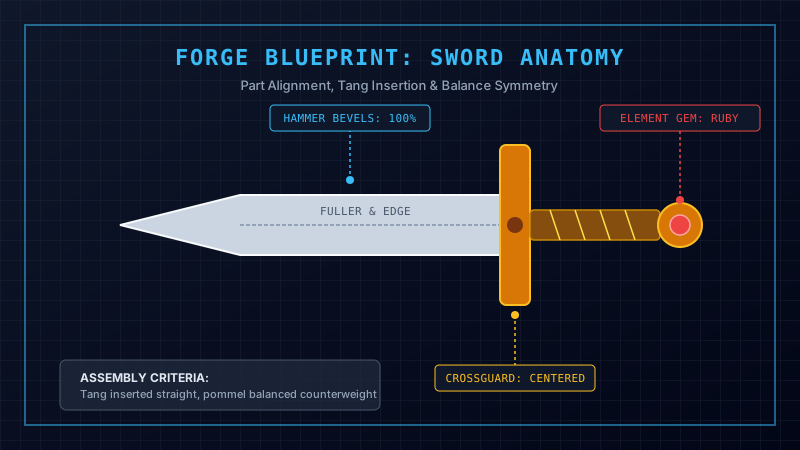
The final stage is assembling crossguards, hilt wraps, pommels, arrow fletchings, and elemental gems onto the forged core.
Step-by-Step Fitting Rules
- Crossguard Centering: Align the crossguard horizontally along the tang crosshair. Even a 2-pixel tilt reduces warrior parry chances.
- Grip Wrap Snapping: Slide the leather, snake skin, or velvet hilt wrap over the handle until it clicks flush against the crossguard base.
- Counterweight Pommel: Screw on the heavy pommel cap at the base of the grip. The pommel acts as a counterbalance, determining whether warriors swing smoothly or suffer recovery delay after strikes.
- Elemental Gem Socketing: If the weapon blueprint features a gem socket, mount a cut gemstone into the housing before the resin sets.

Blacksmithing Progression & Pro Tips
- Prioritize Forge Upgrades: Spend your daily coin earnings on the Bellows Piston and Heavy Anvil Plate early in the campaign.
- Match Weapon Roles to Soldier Classes:
- Pig Soldiers: Require high-durability Swords and Shields from our Shields and Bucklers Deep Dive.
- Archer Hares: Require aerodynamic bowstaves and sharp arrowheads from the Bows and Arrows Deep Dive.
- Berserkers & Mages: Rely on heavy cleaving tools from Maces and Hammers Deep Dive and Magic Staffs and Wands Deep Dive.
- Study Elemental Matchups: Check our Battle and Elements Strategy and Gem Alchemy and Enchanting Guide to exploit 200% elemental weaknesses against boss monsters.
- Track Campaign Progression: Review daily enemy wave rosters in the Day-by-Day Campaign Walkthrough and enemy loot drop tables in Complete Bestiary and Loot Drops.
- Unlock Secret Blueprints: Explore secret weapon blueprints and achievement requirements in the Secret Blueprints and Unlocks Guide or view full formulas in the Weapon Recipes Mastery Guide.
Related Articles
recipes
Jacksmith Weapon Recipes: Complete Blueprints & Crafting Formulas
Comprehensive blueprint guide for Jacksmith weapon crafting including Swords, Bows, Shields, Maces, Axes, and Magic Staffs.
recipes
Jacksmith Bows & Arrows Blueprint Mastery: Limbs, Strings & Feathers
Exhaustive crafting encyclopedia for Jacksmith Bows and Arrows. Wood carving curves, string tension, fletching, and arrowhead metallurgy.
recipes
Jacksmith Shields & Bucklers Blueprint Mastery: Boss Plates & Bracing
Exhaustive crafting encyclopedia for Jacksmith Shields and Bucklers. Metal reinforcement, boss hub centering, and defense calculations.
Was this helpful?
Thanks for the feedback!